I like to tinker around with CMSes like WordPress or Joomla, also every now an then I try to make some simple sites in HTML or php on my own. Of course you can get a shared hosting pack for next than nothing but shared hosting is a little restricted if you ask me.
If you have your own web hosting server you are free to install, update or remove software any time you want. Since I also like ease of management I use a web hosting control panel to manage my websites and sever. My control panel of choice is Virtualmin GPL it is open source FREE and easy to install and configure, also it is under active development and regularly updated.
How to get started:
1. Domain
This is not mandatory but I highly recommend you register/buy your own domain name. This makes it so much easier to remember how to access your server and test things. Freenom.com offers most standard TLD`s and also have for domain spaces where you can register a free domain like .tk, .ga, .gq, ml. .cq. give them a try.
I registered elpmaxe.ml to use as example in this tutorial
2. Server
The second thing you will need is a server, for personal/small group use any vps or dedicated server with 1gb of ram will do fine. If you are looking for a cheap vps my advice would be to go to lowenbox and check the offers they list. some of my personal favorite hosters listed below:
For this tutorial we will be using one of the cheapest hosters I know: budgetvz. Their BVZ1024 offer costs 10euro per year(!) what you will get is 1024MB RAM 25GB HDD, 1 Dedicated IPv4, 1500GB Bandwidth @ 1Gbit.
This is very cheap so please don`t expect 100% uptime or extended support!
When you click on order you will be taken to their product configuration page, here you have to fill in all the usual things (name, email, etc)
Also they ask you for the following:
– Hostname
It is best to use a fully qualified domain name name(so not just your domain) we will use server.elpmaxe.com
– Root password:
make sure you fill in a long and strong password!
– Operating system:
We will choose Centos7 64BIt because centos is one of the most-used operating systems for webhosting servers it very stable and secure.
After everything is filled in and checked choose add to cart and pay the server.
3. Configuration
DNS
When you receive the information of your vps the first order of business is to create an A-record for server.elpmaxe.ml pointing to the ip address of your server with your dns provider (in our case freenom.) Please note: theoretically it can take up to 24 hours before dns records are propagated worldwide, but if you used a A-record that did not exist yet it should work after a few minutes.
SSH
WINDOWS
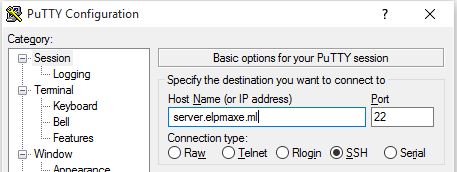
If you are on windows download and install putty. You can download it from here.
After the installation you open putty and fill in your server name like below, after that click on open an login using your username(root) and your root password
APPLE
If you are on mac you can simply open a terminal and type ssh [email protected] when prompted to accept the key type yes and login using your root password.
After logging in to our server the first thing we do is to update the os and installed tools by executing the command below:
yum update -y
(if you use ubuntu execute: apt-get update && apt-get upgrade -y)
Depending on the performance of your server and the amount of updates this can take a while (~10min) when its done it shoud say:Complete
After this we will install some tools we might need later:
yum install nano -y
Now we are ready to download the virtualmin install script:
Type y to continue and press enter, The installation of virtualmin can take a while so now its time to get some coffee/beer.
When the installation is finished successfully you can login to virtualmin using your root credentials at the follwing url: https://server.elpmaxe.com:10000
You will receive a warning from your browser stating the certificate is not trusted and you session might not be private, this is normal since the server is using a self-signed certificate. in chrome you can just click advanced>take me there anyway and the login page will appear.
Presto! welcome to your own web hosting panel/server!
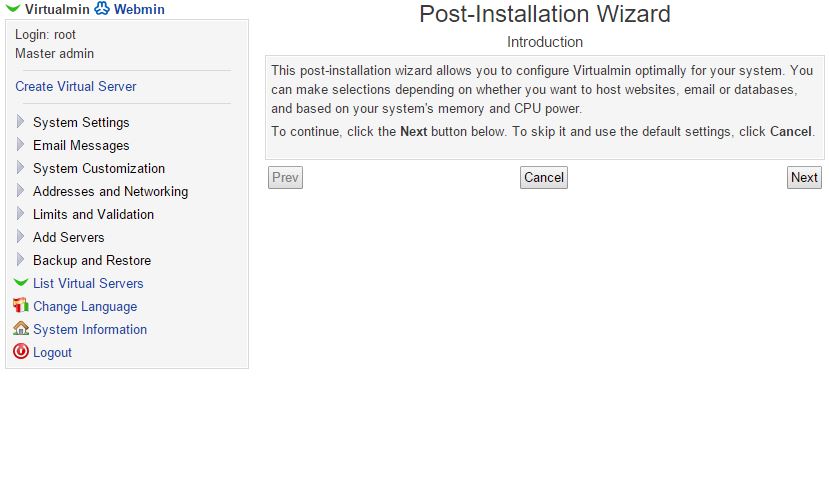
Post installation wizard
If all went well you will be greeted by the Post installation wizard introduction like below:
Go ahead and click next
and click next
Click next
Next
Next
The Mysql password should be filled in, make sure you use a long+strong password and note it somewhere you will remember in case you ever need it.
Next
Leave the mysql database size settings as they are.
Next
The primary namerver should be your own server, leave the secondary empty (if your hostname does not resolve, fill in 127.0.0.1 instead)
next
Next
Virtualmin post-installation configuration is now complete! YAY!
next
Now push the recheck configuration button to check all is well
Our next tutorial will be about getting started with virtualmin and creating your first website on the server using WordPress.
Find a tutorial on how to enable ssl using letsencrypt on your virtualmin server can be found here